Pages

Thursday, 24 April 2014

Chocolate protein cookies

So it's that time of the year again, exams are approaching and the revision frenzy begins! Revision time to me just means less hours sat in lectures and more hours experimenting away in the kitchen!

I have decided to get serious with my eating plan, cutting down on carbs and loading up on protein (haha not too sure how long I'll last this time!). In my attempt to create an easy protein packed snack, I decided to make 2 versions of cookies, a chocolate oatmeal cookie and a vanilla cinnamon cookie. The vanilla one completely failed and looked like some dried up fruit, whoops! But the chocolate one turned out surprisingly good- they aren't very sweet because I didn't add any type of sweetener but you could definitely add in some honey, agave etc if you want to. These cookies have about 5g of protein in each of them and are even nicer sliced open and stuffed with peanut butter.

CHOCOLATE PROTEIN COOKIES
Makes 12
  • 60g protein powder (I used phd vanilla flavour)
  • 5-10g cocoa powder: optional if using vanilla flavoured protein
  • 25g coconut flour, can substitute with whole wheat
  • 30g oats 
  • 1 large or  about 1.5 regular eggs
  • 0.5 tsp baking soda
  • 65 ml non fat milk
  • 30g dark chocolate chips: optional 
  • 30g chopped nuts, I used Brazil nuts, optional
  • 1-2 tbsp honey: optional
  1. Combine the protein powder, cocoa, flour, oats and baking soda together.
  2. Mix in the egg and enough milk to form a sticky dough. Fold in the chopped nuts and chocolate chips.
  3. On a non stick baking tray, form 12 balls with your hands and flatten down with the back of a spoon.
  4. Bake in a preheated oven at 170 degrees Celsius for 10-12 minutes (mine were in for about 13, slightly over cooked :( ).Make sure that you don't overcook these as protein powder baked goods can easily go very dry.
Enjoy and back to my dissertation it is!
Xx


Wednesday, 23 April 2014

Healthy chocolate mousse tart

Happy belated Easter! I hope you all had a lovely time and didn't get too carried away with the chocolates! In the UK, we had a 4 day long weekend, perfect excuse for a break from revision to go sightseeing in London. I also managed to squeeze in a quick catch up with my sister in Bournemouth. We had a lovely picnic in the sunshine in New Forest surrounded by wild horses and donkeys, went to the beach and caught up on some sister bonding time! We popped round to my aunt's place where she had prepared some lovely Mauritian food: faratas, chicken curry and boulettes!

It has recently been pointed out that I've had a somewhat incomplete childhood, having not watched most classic animations! (whoops!). So as I planned to snuggle in bed to Shrek the other night, I decided that a chocolate treat was necessary! Something rich and creamy with a nice crunch. Played around with what I had in the kitchen and there you have it, a sort of deconstructed chocolate mousse pie, healthified. :) I made two types of bases, one chocolate and one coffee flavoured one, the coffee one is slightly bitter and would appeal to adults mainly. Amounts specified are for individual pies so alter according to your pie dish.

CHOCOLATE MOUSSE PIE
Choc base per individual pie
  • 2 tbsp oats, grounded up
  • 2.5 tbsp ground almond, or any other nut meal
  • 0.5 tbsp honey or brown sugar
  • 0.5 tbsp cocoa
  • 1 tbsp coconut oil

    Coffee base
  • 2 tbsp oats, grounded up
  • 2.5 tbsp ground almond 
  • 0.5 tsp instant coffee
  • 0.5 tbsp honey or brown sugar
  • 1 tbsp coconut oil

    1. For any of the bases, mix together the dry ingredients. Add in the coconut oil and mix until it just comes together.
    2. Press the mix into a silicone cake mould or in a metal pan lined with baking paper.
    3. Bake in a preheated oven at 170 degrees Celsius for 15-20 minutes and allow to cool fully.
Chocolate mousse
I've already posted this recipe before, it is the magical avocado chocolate mousse. You only need three ingredients and quantities depend on how sweet and how 'chocolatey' you want your mousse to be, so vary quantities accordingly. If you think that the avocado mousse is too rich (which it might be for children), it is really nice to lighten it up which some banana.
  • Ripe avocados
  • Sweetener- I use honey
  • Cocoa powder
  1. Blend everything together until smooth and creamy.
  2. Spoon over the cooled biscuit base and refrigerate till set. You could also freeze for a couple of minutes for a cool semi feddo style dessert. 
The refrigerated version will still be quite soft so if this is for a dinner party, individual ramekins full of this would be ideal! Decorate with fruit and enjoy!
Here are some Easter cupcakes that I made: carrot cupcakes with cream cheese frosting and coffee cupcakes with white chocolate ganache centre, peanut butter frosting and peanut brittle.

Xx

Saturday, 12 April 2014

Healthy pecan pie!

Hello! So once again, it feels like such a long time since I have updated this blog, but it was all due to some exciting news. After months of applications, interviews, assessment centres and so on, I have finally secured a graduate job! I am going to be an associate in the Audit department of one of the Big 4 accountancy firms, studying for the ACA qualification. I start in September and cannot wait to start this exciting journey. Adding on to this great news, I have also booked my holiday back to Mauritius in June and just can't wait to have a relaxing holiday without any university stress! To mark the end of the term and the beginning of Easter holidays, a couple of us went to Steve Aoki's concert which was amazing with lots of cake throwing, crowd surfing etc.

On to the recipe! A friend of mine is the biggest pecan pie lover and although I had never made one before, I thought that it'd be a great recipe to try out. I made a normal full fat version as well as a healthy alternative to compare results. Both turned out great and I will definitely be making these mini healthy ones again. I only made 3 mini cupcake sized pies, so increase the quantities according to how many you'd like to make.


HEALTHY MINI PECAN PIES
Base:
  • 3 tbsp group almond
  • 2 tbsp oat flour (ground up oats)
  • 0.5 tbsp honey or brown sugar
  • 1 tbsp cocoa (optional for chocolatey base)
  • About 1 tbsp coconut oil to bring it all together
  1. Thoroughly mix together the ground almond, oat flour and cocoa. Stir in the sweetener and oil, varying the amounts until the mixture just starts coming together.
  2. Press the base into greased or silicone cupcake cases and set aside whilst you make the filling.
Filling:
  • 15 dates, soaked for 5 minutes in warm water to soften
  • 1 egg
  • Cinnamon
  • 0.5 tsp vanilla extract
  • 1 tsp honey
  • About 50 g broken pecans
  1. Drain the dates, blend until smooth along with the egg. Stir in the vanilla, cinnamon and honey, varying quantities according to your preferences. Fold in the pecan nuts.
  2. Pour the mixture on top of the prepared bases.
  3. Bake in a preheated oven at 170 degrees Celsius for about 20 minutes or until the mixture looks set.
I recently attended the Cake and Bake show 2014 in Manchester which was amazing! I was able to see live demonstrations by Eric Lanlard (my idol!), Rosemary Shrager and many of the Great British Bake off contestants! The cakes on display were amazing. This year's show hosted the Jungle theme and we were greeted by a huge elephant made of cake, chocolate and intricate sugar work. I think the pictures speak for themselves!

I've also been slightly cupcake obsessed. Cupcakes are so versatile, easy to carry around and make the perfect present for any occasion. Here are a few of my creations: dark chocolate cupcake stuffed with chocolate filling and topped with peanut butter frosting and peanut brittle, carrot cupcake with cream cheese frosting and coffee cupcakes with caramel frosting. 
I'll soon be posting a great yellow Thai curry and a chocolate mousse and almond pie.
Have a great weekend!
Xx

Thursday, 27 March 2014

The best tomato sauce ever

Finally, this long day is coming to an end as I cuddle up in my duvet (yes it is still so cold and wet here, I miss Mauritius!). I've just finished my demography coursework and food prep for my long day at university tomorrow. It has also just hit me that I only have one week of lectures left, ever! This is quite a scary thought but I am excited and can only hope that good and exciting things await!


This recipe is definitely one of the simplest ones on this blog. However, it is also probably one of the tastiest things you'll make! I remember when I used to work at a local cafe, the head chef Jaimie would also give me tips passed down from his mother! He always went on about how the secret to a good tomato sauce is to add in carrots and celery and to allow for the sauce to slowly simmer. I took on his tips, and I was definitely not dissapointed. I skipped out the celery because I made this in a rush, but definitely use it if you have it in stock. I also used canned tomatoes because they are already slightly cooked down but you could swap this for fresh tomatoes, cooking for sauce for longer. This sauce could be used for a variety of things, use as is with pasta or couscous or add in some cooked tofu, chicken, veggies etc. Use it in lasagnas or even to stuffed and roast some butternut, the options are endless.

EASY TOMATO BASE SAUCE
  •  2 cloves garlic, crushed
  • Half a large onion, finely chopped
  • 1 can of tomatoes
  • 1 medium sized carrot, grated 
  • 1 tsp of fresh or dried herbs: basil, thyme or oregano
  • Salt
  • Olive oil
  1. In a saucepan on low heat, pour in a couple of tablespoons of olive oil. Add in the garlic and onion and let this good for a good 5-10 minutes until lightly browned.
  2. Add in the grated carrot and let this cook down for a further couple of minutes. Add in the herbs.
  3. Pour in the can of tomatoes, breaking them up. Let the sauce simmer for a minimum of 30 minutes, storing occasionally and adding water if it dries up.
  4. At this point, you can add in any cooked meat or vegetables. I added some vegetarian mock meat and some grilled courgette slices.
  5. Season and enjoy.

Healthy take on pecan pie coming up soon!
Xx

Sunday, 23 March 2014

Indulgent brownies

Hello! I hope that you all managed to have a great weekend no matter where and what you got up to. After an intense Max Fitness class yesterday morning, it was time for some weekend baking. I decided to make some gooey indulgent chocolate brownies for a house party that night and then went on to making more brownies later on during a baking session with a friend. To me, my weekends are never complete without a little fun in the kitchen:)!
Although these brownies are 100% unhealthy, I do believe that a little indulgence now and then is necessary for one's sanity! I remember bringing these into work as an intern and they were an instant hit! These brownies are guaranteed to put smiles on faces wherever you take them. If you do want to healthy version, try my aubergine brownies for rich gooey ones or my sweet potato ones for a lighter, more cake- like one.

INDULGENT BROWNIES
  • 185 g dark chocolate, broken up
  • 185 g butter
  • 3 eggs
  • 275 g sugar
  • 85 g plain flour
  • 40 g cocoa
  1. Preheat your oven to 175 degrees Celsius.
  2. If you are using a microwave, melt the butter in a large bowl and remove from the microwave. Add in the chocolate pieces and stir around. The residual heat should be enough to melt the chocolate. Alternatively, you can use a double boiler to melt the butter and chocolate together. Once combined, set aside to cool.
  3. In a large bowl, whisk together the eggs and sugar until light, fluffy and doubled in volume. This is (muchh!) quicker with an electric mixer and can take between 5 to 10 minutes.
  4. Fold the cooled chocolate mixture into the frothy egg mixture, making sure not to over mix.
  5. Sieve the flour and cocoa into the batter, folding until the flour is just incorporated, once again, not over-mixing as this would deflate and reverse all the hard work put into beating those eggs!
  6. Line a baking tray with some grease proof paper, pour in the brownie batter and smooth the top with the back of a spoon.
  7. Bake for 20 minutes, the edges should look crusty and when you shake the pan, the middle should have a slight wobble but still look quite firm. If it is still very wobbly, leave for a couple more minutes before checking again. The trick is not to overcook these as they will continue cooking for a little while out of the oven. Leave to cool before slicing up.
You could jazz these up with some melted white/ milk chocolate, crushed nuts, coconut etc.
Here are a few recent 'foodie moments'. The top two are from this week's vegan dinner party. I definitely do not regret starting this weekly vegan affair. Although it does require a little extra thought and planning, it is great discovering all these new and delicious dishes that I probably wouldn't have tried otherwise! Dessert was this amazing avocado chocolate pie. Bottom left is this simple but delicious tomato sauce I recently made, which will be posted soon and to it's right is a carrot cake I made for my friend's 21st recently.
Enjoy!
Xx

Saturday, 15 March 2014

Vegan cheesecakes- really worth making!

So vegetarian 'Come dine with me' style dinner parties have now become part of my weekly routine. Last week was my turn to host and to add to the challenge, one of my friends decided to become vegan for Lent. Although initially uninspired at the thought of vegan desserts, I decided to finally make a nut based cheesecake after having putting it off for such a long time. Results were great and this has now become a definite keeper!

Variations: Although I used raspberries for this batch, you could play around with ingredients and use something that is more accessible and readily available to you. For instance, use the same amount of fresh juicy mango flesh or for flavours such as chocolate, peanut butter or lemon, use bananas as they are bland and would add volume to the mix along with a couple of tablespoons of cocoa, peanut butter or lemon juice. Taste the mixture and alter to your preferences.
Note: You do need some sort of blender for this. A strong hand held blender works just fine. I use the word 'about' in the ingredient list as this was one of those "alter as I went along" recipes, best thing is to use my figures as a guide and taste/alter as you go along.

RASPBERRY VEGAN CHEESECAKES
For about 6 individual cheesecakes
  • About 45g oats
  • 20g of  nuts (preferably easy to blend), I used almond meal, but walnuts and pecans work just fine
  • 1 large tbsp maple syrup / honey if you're not vegan, alter to taste
  • 1-2 large tbsp of coconut oil
  1. Preheat the oven to 170 degrees Celsius.
  2. To make the crust, blend the oats and nuts until you obtain a powdery, lump-free mixture, pour in the sweetener of choice and oil until everything comes together.
  3. Divide the crust into greased individual mini muffin pans (I used silicon muffin cases just to make sure they didn't stick, but if not, greasing well should do the trick). How many you make will depend on how thick you want your crusts to be. Press the mixture firmly down with the back of a spoon and bake for about 8-10 minutes until golden brown. Remove and leave to cool.
Raspberry filling
  • Around 150 g cashew nuts (unsalted preferably), wash and soak in warm water for at least 40 minutes until soft
  • Around 60 g of raspberries or other fruit, I would add more next time!
  • About 5 generous tablespoons of coconut milk
  • About 5 tbsp of maple syrup/ honey or more according to taste
  • 6 tbsp of coconut oil (helps to set the cheesecake)
  • 1 tsp vanilla extract
  • 1 tbsp lemon juice, optional if mixture tastes too rich
  • Fruit to garnish, optional
  1. Blend the drained cashew nuts, berries (or selected variation), coconut milk and sweetener of choice until broken down nicely. 
  2. Slowly pour in the coconut oil whilst blending on high and you obtain a smooth mixture. Add in the vanilla and lemon juice. The mixture should be relatively thick, similar to chocolate mousse or instant pudding.
  3. Pour the mixture on top of the completely cooled bases and leave in the fridge for a couple of hours, or if in a rush freeze for an hour or so, making sure to leave in the fridge a little before serving.
  4. Decorate with fruit, nuts etc.
Enjoy!
On another note, this week was my best friend Nan's birthday! It saddens me to think that in a couple of months, all my University friends will be heading off to different parts of the world to start new chapters in their lives. I decided to make Nan a pink ombre rose birthday cake which we surprised her with during one of our Econometric teaching sessions. Here's the surprise video played to her during our session, with amazing vocals by Mr Anthony!
Click here for video

Xx

Wednesday, 5 March 2014

Cookie madness

So yesterday was Shrove Tuesday, the day before Lent begins, the Christian period of preparation for Easter. However nowadays, the day is most commonly referred to as 'pancake day' by many. Sadly, for some reason, the pancake addict did not make any pancakes yesterday, I blame all the university work! However, Instagram and Facebook have been full of pancake inspiration and here's a mouth watering example I had to share with you by njstramfam from Instagram.


Given the amount of time spent on campus nowadays, I've been desperate for some easy to carry, sweet,  satisfying and healthy snacks. What better than some cookies?! I decided to play around with a few recipes that I found online as well as with what I had in stock and came up with some 'Nutella' cookies and some soft and chewy cinnamon & ginger cookies. Both really hit the spot! The Nutella ones are more filling and 'textured' whereas the spiced ones are lighter and much softer.

NUTELLA INSPIRED COOKIES
Makes around 15 cookies
  • 50 g hazelnut, roasted
  • 10 dates, soaked, drained and puréed 
  • 25 g ground almond
  • 2 tbsp cocoa, slightly less if you aren't keen on bitter dark chocolate
  • 40 g whole wheat flour
  • 1 tbsp peanut butter
  • Pinch of cinnamon
  • 1 egg
  • 2 tbsp coconut oil
  • 1 tbsp honey (optional, alter sweetness to taste)
  • 1 tsp vanilla (optional)

1. On a hot (dry) frying pan, lightly roast the hazelnuts until fragrant. Flake off and discard the excess skin.
2. Chop up (or bash with a rolling pin like I did) the hazelnuts into small chunks and keep aside.
3. Mix together the date purée, peanut butter, egg, vanilla, honey and coconut oil until well combined.
4. Fold in all the rest of the ingredients, including the nuts and combine until the mixture is uniform. 
5. Form mini balls of the dough, place on some grease-proof paper on a baking tray and press the cookies into shape with the back of a fork.
6. Bake at 170 degrees Celsius for 10-12 minutes, they burn really easily so keep your eyes on these!
7. Once cooled, dip/decorate with melted dark chocolate and store in an airtight container.


SOFT AND CHEWY SPICED COOKIES
  • 10 dates, soaked, drained and puréed 
  • 40 g coconut flour/ whole wheat/ oat flour
  • 40 g ground almonds
  • Pinch of baking powder
  • 0.5 tsp cinnamon (or more!)
  • 0.5 tsp ginger (or more!)
  • 1 tbsp coconut oil 
  • Pinch of salt
  • Half an egg
  • 1 tbsp honey
1. Combine the date purée, coconut oil, egg and honey together.
2. Fold in the ground almonds, choice of flour, baking powder, spices and salt and mix until you obtain a soft dough. If too sticky add a little more flour and if too dry looking add a little honey/ egg. Also, try the dough and alter according to our taste, I added a lot more cinnamon and ginger because I love spiced baked goods!
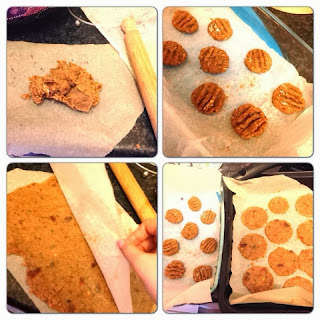
3. Use the same method of shaping cookies as with the Nutella cookies or if you want very thin and slightly crisp cookies, refrigerate the dough, roll between two pieces of grease-proof paper and form into circles. Both work great, the thinner cookies are delicious sandwiched together with light cream cheese and banana slices.
4. Bake at 160 degrees for around 13-15 minutes until 'dry' to touch and slightly browned.

These are very rustic and homely cookies but I find that there is something so comforting about spices in baked goods which makes them irresistible :)!
Enjoy 
Xx